


Fitment:
FORD F150 2000 – 2014
FORD F250 F350 F450 2005 – 2016
FORD Expedition 2000 – 2017
Lincoln Navigator 2000 – 2017
Lincoln Mark LT 2000 – 2017
Features:
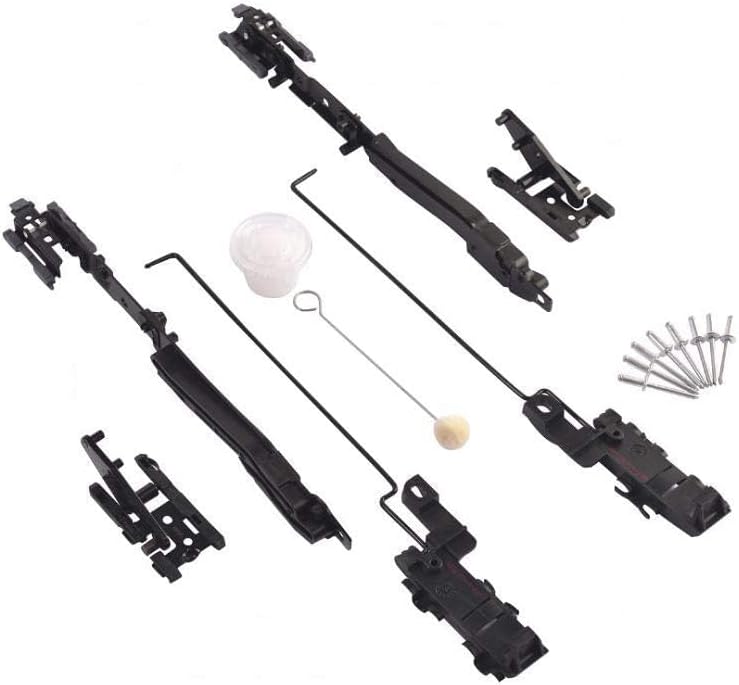
Complete Repair Kit
Perfect fitment
High-quality materials
1 Year Warranty
Kit Includes: Installation Instruction / 8 Rivets / Synthetic Greace / Grease Applicator
Experience the luxury of a sunroof without the hassle of operational issues with our sunroof track repair kit. Sunroofs are a popular feature in many vehicles, providing natural light and fresh air to the cabin, but it’s common for the plastic parts in the track to deteriorate over time, leading to functional problems.
Our durable and reliable sunroof track repair kit includes high-quality materials that prevent the plastic parts from breaking, ensuring smooth and uninterrupted sunroof operation. Our kit includes all the moving parts for both left and right tracks, ensuring a perfect OEM fit.
We use only the highest quality materials, including durable metals, reinforced plastics, and weather-resistant coatings, to ensure that our replacement parts are long-lasting and can withstand the rigors of regular use, providing safe and smooth sunroof operation. Although our replacement kit may not be an original equipment manufacturer (OEM) part, it is designed to be a direct replacement for the original parts, offering the same fit, form, and function.
NOTE: After installing the sunroof track repair kit, it is important to reprogram or initialize the sunroof to ensure proper operation. This can be easily achieved by following a few simple steps. Start by pressing the slide button to close the sunroof, then quickly hold it down again for a few
SUNROOF TRACK REPAIR – A sunroof is a popular feature found on many vehicles, a sliding glass panel that allows for natural light and fresh air to enter the cabin. It’s common for sunroofs to encounter problems, such as becoming stuck or failing to open or close properly. This happens because of deterioration of plastic parts in the track, which can become brittle and break over time.
“DIRECT REPLACEMENT – Sunroof track assembly repair kit is designed to be a replacement for the original parts, offering the same fit, form, and function. Kit Includes: Installation Instruction / 8 Rivets / Synthetic Greace / Grease Applicator”
PERFECT OEM FIT – This kit is designed specifically for your vehicle. It includes all the moving parts for both left and right tracks of the sunroof. Note: Don’t test the electronic operation of a sunroof after installation without the glass panel installed as it can lead to damage.
HIGHEST QUALITY – We use high-quality durable metals, reinforced plastics, and weather-resistant coatings to ensure that the replacement parts are reliable, long-lasting, and can withstand the rigors of regular use, providing safe & smooth sunroof operation.
SATISFACTION GUARANTEED – We are domestic American brand, your satisfaction is our ultimate priority. Our team strives to ensure that you are happy with your purchase and we are committed to meeting your needs. If for any reason you are not completely satisfied with our products or services, please do not hesitate to let us know. We will do everything in our power to make it right!
Price: $35.44
(as of Jan 30, 2025 00:31:45 UTC – Details)

Customer Reviews
Reviewer: FB4ND
Rating: 5.0 out of 5 stars
Title: This Worked Great!
Review: This kit just saved me more than 1200 dollars. I got three quotes from Ford, An auto glass shop and an Auto Body Shop. All were over 1600 dollars to repair the sunroof. I watched the youtube video a few times start to finish and took notes and time stamps of the steps I knew I would want to look at again as I did them. I had a friend help and it took less than 4 hours. No extra pieces left over and nothing broken. Make sure you have all the tools the big torx bit for removing the seat belts was 4 dollars at the auto part store. We had a rivet gun and hex wrenches. The fit was a bit tight but once in and cycled a few times it worked fine. Do not hesitate to buy this if you have slightly above average skills. If you are easily frustrated pay the pros and note they Will Not use this kit they will require an OEM part that is about 1000 dollars.
Reviewer: Sarah Papple
Rating: 5.0 out of 5 stars
Title: Blown Away!!
Review: 8 months in with normal sunroof operation. Still working like a champ.
Reviewer: Brien Sickler
Rating: 5.0 out of 5 stars
Title: So far so good
Review: Was a little skeptical from all the problems people were having. Went with this seller because they higher numbers.The job is not difficult, just time consuming as so much disassembly has to be done. I had no issues with extra tabs or anything, but things change between years. The kit worked like a charm for me. Also, if it has been a while, if at all, that the glass seal has been replaced, now might be a good time to replace it. Installing the new glass seal was the hardest part about this job.Pull the fuse for the interior lights. On my truck this fuse is also for the power windows and sunroof, so if you want the windows down, now is the time to lower them.Move the front seats forward to help remove the front seat belt trim cover, pull the seat belt way out, and lay them cross ways behind the front seats. Some videos show leaving the headliner in. Do yourself a favor and take it out. Pull the front head rests out, lay the seat backs back as far as they will go, and you can rotate and remove the head liner through the front passenger door, sunroof opening first.When you have the frame laid out on your working surface, take a picture of how stuff is laid out.Drill the rivets on the cable end, NOT the air deflector end. There is a butyl sealer between the end caps and the track. Slow easy pressure and the end cap will come out. DO NOT SCRAPE THAT SEALER OFF !!!!!! It’s going to seal the pieces back together later. On my 2002 F1500 Lariat, the sliding cover will not come out the cable end of the track, so be careful when cleaning. If you want to remove it, you need to remove the air deflector cap. (remove the 2 little screw holding the air deflector limit straps, fold the deflector back onto the track, and slide it from under the retainer. Drill the 3 rivets like the other end, and carefully remove the cap. You will need more 3/16 aluminum rivets, The cover can now be removed out that end. Note that when you reinstall the end cap, you will need to trim the excess off the rivets so the air deflect and spring will clear them and lay down all the way. I actually have to use a small file for final fitment, but was no biggie.)The instructions say to use carb cleaner, but if the tracks have dried up moly grease like mine did, soak it down with WD40 first to dilute the old stuff, do a light scrub with a old tooth brush to loosen it up, and a quick rinse with cleaner that is safe for plastics. You need to clean the aluminum tracks end to end. Do the cleaning outside or have cardboard under it. This is a messy job. Most of the grease supplied is going to be used in the tracks. Coat everything liberally. This includes the air deflector ramp and the top of the track. Leave a small amount to coat the new rail pieces. You should also apply some to the cable ends upon installing them. You will need a rivet gun that can handle 3/16 rivets (fyi 1/4in rivets are to short). The track to end cap sealer appears to be a liquid butyl sealer they use in the factory. I couldn’t find any, so I just cleaned all the aluminum chips out with a pick, heated it a little with a heat gun on low (be careful not to get the plastic to hot or the rivets will pull through) just enough to soften the sealer, then re-assemble. The reason this sealer is used is it does not dry at all. It stays soft and flexible. Rtv and silicone will be as flexible as this stuff is.Other things you NEED to know. Don’t install the head liner until you test run the sunroof first, and don’t run it with power until the glass is in. When you reinstall the glass used the old marks from the washers for locating it temporarily. Install the frame completely, and make sure all the bolts are tight. Install the glass, and plug the motor up. Temporarily install roof control button assembly and the fuse if your windows stopped working when it was removed. Turn the key on and try the roof. Chances are it just wiggled at best. Needs to be re-initiated. on mine, press and hold the close/tilt button. Eventually it will do a little jig. Let off the button at that point. It should be set to go. hit the auto button and see what it does. If everything is good, run it though a few complete cycles 3 or 4 times.Now you need to adjust the glass. Close the sunroof. Loosen the glass retaining screw just enough to move the glass. Factory setting are for the front of the glass seal to be 0.000-.039in blow the roof, and the back 0.000-.039 above the roof. I set mine at just under the roof on the front, and just over the roof on the back. Prob in the .015-.02 range. The reason for this is to keep rain and wind from getting forced past the seal when driving.Now pull the fuse again and reassemble your ride. Just a side note. I would get some spray silicone grease (not lubricant, grease) of even just some silicone grease, and give it a coat every year to keep things from binding up.
Reviewer: Greg Tumpney
Rating: 4.0 out of 5 stars
Title: rember to rest the sunroof after installing
Review: They said this would fit my sunroof, I took this to my mechanic, who with these parts could only get the sun roof to tilt up, but it will not slide because the parts are to big to slide in the track. The piece that is supposed to bring the slid in the head liner back with the glass will not fit at all due to the piece having extra area on it that the original part does not have. After another trip to the mechanic he found out that you have to hold down one or both the sunroof buttons to reset the sunroof ( not sure if it one or the two you have to hold down ).. The sunroof now works fully, but the pieces to bring the head liner back did not work he had to use the old ones.
Reviewer: The Garage Organization Company
Rating: 1.0 out of 5 stars
Title: Do not buy this product. Defective Manufacturing
Review: First, the parts were incorrectly stamped with Left or RIght. I had to intermingle parts from the left and right. Second, one of the tracks had a piece of metal left in the hole that the glass bolts into. Tried to remove this metal insert but could not. I chose this part because it looked like it had higher reviews than the cheaper versions. Do not buy this or any of the cheap parts listed for this repair. This repair is time consuming as it is. Now my vehicle is inoperable until I can order a replacement again. You should see the instructions. Completely broken English with misspellings and no photos .Luckily I studied videos prior to installation. Another poor example of this platform allowing anything to be sold, even with horrible quality.
Reviewer: Ray S.
Rating: 5.0 out of 5 stars
Title: This kit is the best quality on the market when writing this review 07/2023
Review: I paid for this product with my own money. My 2010 F150 Platinum Crew Cab had sunroof assembly broken down and after watching videos on YouTube decided to take this up myself. Lot of hours spent since I’m a weekend fixer. I wanted to make sure, I buy the best quality parts to fix the sunroof since it requires pretty heavy teardown and don’t want to do this again, especially not for bad parts. I bought ALL the parts available on Amazon for fixing the sunroof. I also bought Sunroof Doctor kit available at $110 currently while this product is around $44. I found this product and all individual parts substantially superior to Sunroof Doctor. Please see pictures attached. Parts were great fit. I recommend this highly to all fellow F150 owners looking to buy the best parts and save some ð° as cherry on top. Good luck with your fix.
Reviewer: Riemer Faber
Rating: 5.0 out of 5 stars
Title:
Review: This was an exact fit for the F-150 sunroof I was repairing! It worked perfectly!There are several youtube videos showing how to install it. The sunroof needs to come out!
Reviewer: Glenn
Rating: 5.0 out of 5 stars
Title:
Review: I am not a person to write reviews but I definitely recommend this kit. The quality is better than the Ford parts from the factory. Yes there is a lot of work involved to remove the frame from the vehicle but for anyone somewhat mechanically inclined it is worth your time rather than pay the rip off price at the dealership.
Reviewer: Keith Jewell
Rating: 5.0 out of 5 stars
Title:
Review: I got this for my truck but have not had the time to install yet,as I need to drop the headliner to installFrom looking it appears to be very complete
Reviewer: Erin
Rating: 1.0 out of 5 stars
Title:
Review: The tolerance of this part of the assembly was off and would not fit into the tracks. It was about 1/16th too wide. I had to use needle nose pliers to reshape it to get it to work.
Reviewer: Brian Pablo Torres
Rating: 5.0 out of 5 stars
Title:
Review: Worked perfectly. A little tricky to install if you’re not used to taking the interior of your truck. Works like factory new. Love it
Leave a Reply